Sunday, July 17, 2011

Lemon Meringue FAIL

Have you ever watched the Food Network and wondered how all of the chefs manage to make perfect dishes EVERY time?? Well. I have the answer. They don't. Their recipes come from countless attempts at perfecting a base recipe. And even when a recipe has been perfected, sometimes that recipe will still not work.
Baking is a funny thing. What every aspiring chef/baker/cook/experimentalist needs to understand is that baking is chemistry. Maybe not in the same sense of the chemistry we all took in high school (thank God!!!), but in the sense that reactions need to occur in order to get desired results. There has to be enough of ingredient "a" that when added with ingredients "b" and "c", "d" occurs. If the proportions are off, or the ingredients are too old, or the weather is too humid, or the baking gods just aren't liking you that day, the desired reaction will not occur. This will leave you with a FAIL. How many cakes have not risen? How many cookies, instead of forming soft mounds of goodness, have just spread themselves onto the cookie sheet leaving you with a crispy sweet cracker to eat? I can not count the number of times these things have happened to me. Sometimes I have figured out the reasons why, but other times, I have had no idea why a recipe that I always make and know like the back of my hand has failed me. To put it in simple terms, you are not a bad cook if things don't go right in the kitchen. Don't get discouraged. Laugh about how bad your item turned out, make sure to take a picture, and Get right back in that kitchen and bake again.
As you can tell be the title of this post, I had a recent baking fail. What had started off like any other blog entry turned into a kitchen nightmare. I was trying a lemon meringue pie recipe from Alton Brown this afternoon because for some weird reason, I thought that it was a good idea to buy 2 Kg of lemons last week and I had no idea what to do with them all. I am not a novice at making these pies. I have done so successfully every other time I have made one. Which is why, I thought that it would  make a good blog entry. I gathered all of my ingredients, took the required pictures and started.
The first thing that went wrong was the crust. For the recipe, you need a pre-baked pie shell, so I put the shell in the pie dish and baked it. When the crust had finished, I took it out and realized that it had all shrunk down and there was no longer a crust around the majority of the pie dish. Oh well. This pie was only for my husband and I, so it really wasn't that big of a deal. I continued with my pie.
The next thing that went wrong was the filling. The recipe (which you can find here: http://www.foodnetwork.com/recipes/alton-brown/lemon-meringue-pie-recipe/index.html ) stated that I was to use 1/3 cup of corn starch. I have a feeling that the amount should have been increased. After I had done everything I was supposed to with it (and believe me, my grade school teachers were wrong. I CAN follow directions!), the consistency was just too syrupy.
The final thing that went wrong with this hellacious pie was the baking of the meringue. In short, the meringue didn't end up with the beautiful dark brown tips fading into white. Nope. It ended up a flat brown moonscape.
I thought that perhaps, after it had been in the refrigerator for a bit, it would firm up. Wrong. I cut into it and had a river of lemon filling flowing out. The taste was good, though.
As I stated before, I had taken multiple pictures of the process, but seeing as how the end result was so dismal, I will not post them. Instead, please share a laugh with me over my latest kitchen fail!
What was your worst fail?
Alien Landscape? Nope. Just My Fail.
Sickly Brown Meringue

River of Lemon Syrup

Appetizing

Thursday, July 14, 2011

A Taste of Gou

Recently, I had lunch with two friends at a small restaurant in Woluwe-Saint-Pierre, Belgium (just to the East of Brussels center). I had heard a lot about Gou, which is a French play on the word goût (taste). The name certainly lived up to my experience. I just wish that I hadn't tasted so much!

There is a limited lunch menu which offers several choices of pasta, fish, salad and steak. Two of my group decided to try the pasta, while the other tried the fish. I ordered the Papardelle with mushrooms, parma ham, roquette, and truffle oil. At first taste, this dish was phenomenal. The mushrooms and sauce were wonderfully prepared and I could really taste the hint of truffles that was written in the description of the dish. Then I took another bite. That is when the dish went downhill. The parma ham, while a good idea in theory, did not do so well in the practicality of the dish. As most people know, parma ham is a salt-cured product. Add that to the extreme amount of salt added to the rest of the dish, and you end up with a salt-laden waste of food. I ate what I could, but ended up saving the rest for my husband - who is a self-proclaimed "saltaholic" (and even he thought that it was too salty).
Salty Papardelle

My friend ordered the plank roasted salmon served over mixed vegetables and garnished with a light lemon sauce. She said that it was very good and it was also very nicely plated.
Salmon

Now comes the fun part. My friend's daughter was with us for lunch that day. She ordered the "Spighe" which, on the menu was described as: artisanal pasta, tuffed with ricotta, truffles, and sage butter. Seems pretty straight forward. What she ended up getting were four pasta dumplings filled with a gritty mixture of shrimp, salmon, and ricotta. On top of that was a slice of smoked salmon and a cream-based sauce. Never have I seen something so different from what was ordered come out of a kitchen. Luckily, she liked fish! On a side note, I was trying to determine if perhaps spighe is the Italian word for salmon or fish. It turns out, spighe is the plural of spiga, which is defined as being an ear of corn or a spike. I honestly have no idea why this dish was named as it was.
The Mysterious Spighe

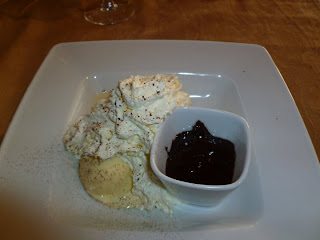
After our mostly disappointing meal, we tried the desserts. My friend's daughter ordered the dark chocolate mousse, while I ordered the Dame Blanche (In Belgium, Dame Blanche - or white lady, is a very popular dish equivalent to an ice cream sundae. It consists of vanilla ice cream, whipped cream and a small pot of warm chocolate to pour over the sundae). While our main courses were all plated beautifully, the chocolate mousse looked like - as my friend so aptly put it, "Something you would find on a sidewalk." Once you look at the picture, I think that you will see what she means.

My Dame Blanche left a lot to be desired. For such a simple dessert, it should not be too hard to get it right. The ice cream had pieces of ice mixed in with it, making it almost gritty and not pleasing on the palate. The rest was fine, but for the price, I expected better.

After my lunch there, I spoke with another friend who loves Gou and has eaten there multiple times. She had never eaten there for lunch, only dinner. Maybe I will give it a try for dinner, but knowing how the dishes and descriptions vary, I am not so sure that I will go any time soon.


Gou
Avenue Orban 231
1150 BRUSSELS ( WOLUWE-SAINT-PIERRE )
Tel. : 02.770.20.25
Fax : 02.770.20.22
Closing days: Sunday, Monday
http://www.gou.be/

Pricing: For the three of us (with no alcohol), the bill came to around 70 Euros. I feel that for the quality of the food, the price was pretty high.

Ratings:
Ambiance: 7/10
Service: 8/10
Food: 6/10
Price: 6/10

Wednesday, July 6, 2011

How to Roast a Chicken Without Burning Down the House or Killing a Guest with Food Poisoning

Have you ever wandered down the aisles of your local supermarket and smelled the wonderful, savory scent of the roasted chickens in the deli section? Have you ever wondered how to do this at home? Well if you answered yes to either of these questions (or even answered no), I will show you how to safely roast a chicken at home that will taste even better than the roasted chicken at the grocery store! The two best parts of this recipe are how easy it really is and how great it will taste.
The wonderful thing about buying whole chickens is how cheap they can be. It is not uncommon to find a whole chicken for under $3.00. A whole chicken (weighing between 2 to 2.5 pounds) can feed 2-3 people depending on their appetites. The reason a whole chicken is so much cheaper than other forms of chicken is that there are no added costs of quartering, deboning or fileting. When selecting your chicken, make sure to check the expiration date - obviously, you want the freshest bird available. Additionally, be advised that different types of chickens have different colors. For example, a corn-fed chicken has yellowish tint to it's skin. Don't worry about it, it is perfectly normal. Just make sure that the chicken you pick out doesn't vary too greatly in color from the other chickens of the same type. Personally, I usually pick out the chickens that are on sale. I do not notice too much of a difference in taste between regular chicken or chicken fed on a different diet (Although, for those that wish, organic chickens are almost always readily available - but at a much higher cost).
Prepping a chicken for roasting is incredible easy. Before you touch the raw poultry, you will need to set up your work area and open your spices. For seasoning chicken, I always use olive oil, salt and a mixture of dried onions, peppers and garlic. There is no rhyme or reason with the spices that you can add to a chicken - basically, just use what you have on hand and what you think will taste good! Get out a roasting pan, and preheat your oven to 350 degrees (180 Celsius).
*Now, before you begin handling the poultry, remember: Never touch anything after you have touched raw poultry without first washing your hands!*
The first thing that you need to do is thoroughly wash the chicken - inside and out. Once you have done this, dry it off with a paper towel. Then, place the chicken (or chickens) in the greased roasting pan (even though the chicken will emit oil, I have found that unless I spray the bottom of my roasting pan with non-stick spray, the bottom tends to stick to the pan).

With one hand, pour enough olive oil onto the chickens to give them a light coating (this is what the seasonings will adhere to). With the other hand, rub the oil in to all of the crevices of the chicken. Next, with the hand you used to pour the oil, grab your seasonings and sprinkle liberally all over the chicken and rub the spices in with the other hand. That's it. Total prep time? About a minute. Now wash your hands!
Ready to be put in the Oven

The next thing you will have to do is to determine the cook time for your chicken. The general rule of thumb is to roast for 20 minutes for each pound plus an additional 15 minutes. For example, a 3 pound chicken will need to be roasted for 1 hour and 15 minutes. If you are bad at math (like me), there are plenty of websites that can help you calculate the roasting time.
Once you have figured out how long the bird needs to be cooked, pop it into the preheated oven uncovered and pour yourself a nice glass of wine. After the allotted time, insert a meat thermometer into the chicken's inner thigh (without touching the bone) and verify that the temperature is 165 degrees (75 degrees Celsius). If it has reached this temperature, take it out of the oven and cover it with tin foil. The chicken should remain under the foil for around 10 minutes. This is commonly called letting the chicken "rest". Resting is done in order for some of the juices that were lost in the roasting to be reabsorbed - which will result in a much more tender chicken.
Finished Chickens

The life of the chicken doesn't end here, though. Once you have picked the carcasses clean of any meat (see the following paragraph about a great use of leftover chicken), you can make a great chicken bouillon. Just toss the carcasses into a large stock pot along with: carrots, celery, onions, salt and garlic and boil for several hours uncovered. Once the liquid in the pot has reduced to about half, strain all the liquids into a smaller pot. From there, reduce the stock until you only have about a cup or so left in the pot. Put the stock in the refrigerator for around 6 hours and then skim any of the fat that rises to the top. From there, pour the remaining liquid into ice cube trays and freeze. This is a great alternative to store-bought bouillon. Just remember that the bouillon will be concentrated, so you will need to dilute it when using it.

With regards to the leftovers, you can make a chicken salad! Just chop any of the spare chicken, mix with the seasonings of your choice and mayonnaise. Yum!

Good luck and if you make this, let me know how the chickens turn out!

Saturday, July 2, 2011

Yes You Can! (Bake a Chocolate Cake from Scratch)

Ahhhhhh. Chocolate Cake. I remember as a kid, getting out the Betty Crocker cake mix and helping my mom bake cakes and spread said cakes with frosting in a can. I am sure that we all have similar memories of those wonderful magic mixes in which all we had to add were eggs and oil (there were even pictures on the back of the box!!), pop it in the oven and Voila! A wonderful cake awaiting it's liberal covering in frosting! And there is nothing wrong with that - in fact I still have cake mixes in the pantry. They are quick, easy and taste pretty darn good. Not to mention the tubs of ready-made frosting. Heck, I have been known to grab a spoon and eat the frosting by itself. And I am sure I am not the only one reading this who has done that!
But this post isn't about a cake in a box. This post is about constructing something to be proud of. It is about taking the time to make a cake from scratch. It is about taking a step back in time - before Ms. Crocker made her wonderful mix. To make a cake like your Grandmother did. This can be a very soothing and therapeutic ritual. I know that it is for me. There is something wonderful about weighing and measuring ingredients to the precise degree needed. This recipe takes quite a while (with the baking and cooling times that are involved), and if done right, you will feel better once you have finished it. After all - baking something from scratch is an accomplishment to be proud of!
The recipe that I am sharing is a favorite in my household. Ina Garten, also known as the Barefoot Contessa, developed a wonderful recipe called "Beatty's Chocolate Cake" I don't know who Beatty is, but he or she deserves a standing ovation for this cake. Among it's ingredients is hot coffee and of course, chocolate. Here is the recipe directly from the Food Network website (http://www.foodnetwork.com/recipes/ina-garten/beattys-chocolate-cake-recipe/index.html). I am adding in some hints and clarifications that I feel are important:

Ingredients

  • Butter, for greasing the pans
  • 1 3/4 cups all-purpose flour, plus more for pans
  • 2 cups sugar
  • 3/4 cups good cocoa powder
  • 2 teaspoons baking soda
  • 1 teaspoon baking powder
  • 1 teaspoon kosher salt *Just use regular salt*
  • 1 cup buttermilk, shaken
  • 1/2 cup vegetable oil *I find that using olive oil gives this cake a better flavor*
  • 2 extra-large eggs, at room temperature *I have used both large and XL eggs, and I do not notice a difference in the outcome - no need to buy different eggs*
  • 1 teaspoon pure vanilla extract
  • 1 cup freshly brewed hot coffee *The coffee does not need to be fresh. But it does need to be hot. I have used both fresh coffee and coffee that was made a few hours before baking - I noticed no difference in taste*
  • Chocolate Buttercream, recipe follows
Ingredients Needed for the Cake

 Directions

Preheat the oven to 350 degrees F. Butter two 8-inch x 2-inch round cake pans. Line with parchment paper, then butter and flour the pans. *This is a confusing part of the recipe. I am sure most of you have never had to line a pan with parchment paper. I never had until I made this recipe. I have tried this recipe without parchment paper, but the cakes tend to stick to the pan. The paper is necessary for this cake. Here is a link that I used to learn how to line the pans: http://www.youtube.com/watch?v=OxB7VRdnK5o . First, spread the butter on the pan using a paper towel. Then, butter the top of your cut parchment paper. Put about a tablespoon of flour in the pans and tap the pans until the flour is evenly distributed - make sure to tap out any excess flour. Then, roll some flour around your parchment circles. Place the circles in the pans.*

Buttering a Pan with a Paper Towel

Buttered, Floured Pans with Parchment Paper


Sift the flour, sugar, cocoa, baking soda, baking powder, and salt into the bowl of an electric mixer fitted with a paddle attachment and mix on low speed until combined.

In another bowl, combine the buttermilk, oil, eggs, and vanilla. *I usually whisk these ingredients together until combined.*

With the mixer on low speed, slowly add the wet ingredients to the dry. With mixer still on low, add the coffee and stir just to combine, scraping the bottom of the bowl with a rubber spatula. *This is a very important step! First, since you are adding a hot liquid (coffee) to a batter with raw eggs, you will need to pour the coffee into the mix slowly! Otherwise, you may end up scrambling the eggs in the batter. Also, after adding the coffee, the top of the batter will be watery, and the bottom will be thick. It is ESSENTIAL to thoroughly mix this batter with a spatula to evenly distribute the ingredients.*
Proper Consistency After Coffee has been Added

 Pour the batter into the prepared pans and bake for 35 to 40 minutes, until a cake tester comes out clean. Cool in the pans for 30 minutes, then turn them out onto a cooling rack and cool completely.

Place 1 layer, flat side up, on a flat plate or cake pedestal. With a knife or offset spatula, spread the top with frosting. Place the second layer on top, rounded side up, and spread the frosting evenly on the top and sides of the cake.

Chocolate Frosting:

  • 6 ounces good semisweet chocolate
  • 1/2 pound (2 sticks) unsalted butter, at room temperature
  • 1 extra-large egg yolk, at room temperature
  • 1 teaspoon pure vanilla extract
  • 1 1/4 cups sifted confectioners' sugar
  • 1 tablespoon instant coffee powder *Not straight from the jar! Instant coffee needs to be ground down to make the powder. Either use a mortar and pestle, or give it a quick whiz through the food processor*
Ingredients Needed for the Frosting

Chop the chocolate and place it in a heat-proof bowl set over a pan of simmering water. Stir until just melted and set aside until cooled to room temperature.
In the bowl of an electric mixer fitted with a paddle attachment, beat the butter on medium-high speed until light yellow and fluffy, about 3 minutes.
Butter Should be Light Yellow and Fluffy
 Add the egg yolk and vanilla and continue beating for 3 minutes. Turn the mixer to low, gradually add the confectioners' sugar, then beat at medium speed, scraping down the bowl as necessary, until smooth and creamy. Dissolve the coffee powder in 2 teaspoons of the hottest tap water. On low speed, add the chocolate and coffee to the butter mixture and mix until blended. Don't whip! Spread immediately on the cooled cake.*Do not put the frosting on top or in the middle of the cakes until they are THOROUGHLY cooled. Otherwise, it will just melt into the cake. And while tasting good, it won't look appetizing at all!*
Finished Cake
If you try this, let me know how it goes and feel free to ask any questions! Good luck, and congratulations!

Great Lebanese Food for a Great Price!

My husband works in the center of Brussels, and once a week I travel there for lunch with him. Last week we decided to try a restaurant that we had been hearing a lot of good things about. Snack Libanais is a tiny restaurant situated on a busy road. Unless you are looking for it, you wont find it, as the store front awning still touts the name of the previous restaurant (Le P'tit Noeuf Gourmand). This restaurant is the real deal. Cheap, fast, and authentic Lebanese food. In addition to the dining room that seats around 20 guests, there is also a deli-style setup in the front of the store. You can purchase many items there to go, including brochettes, stuffed grape leaves, hummus and rice (more about that later).
The Inconspicuous Storefront

To begin our meal, we shared a plate of moutabal (otherwise known as baba ganoush). For those that do not know what moutabal is, it has the same consistency of hummus, but instead of chick peas being the main ingredient, roasted pureed eggplant takes center stage. It makes for a very light and refreshing appetizer. This particular moutabal had a lot of lemon added to it - which I loved, but my husband wasn't too keen on. The moutabal was served with a light drizzle of olive oil, diced tomatoes and chopped fresh herbs. We were also given slices of fresh pita to dredge through it. Yum!

For our main course, I ordered the plat du jour - which consisted of roasted meat, roasted eggplant and roasted tomatoes. This was seasoned with fresh herbs and served alongside a mound of the best rice I have ever tasted. This rice was the star of my dining experience! don't get me wrong, I loved my meal - but the rice pushed the dish from "very good" to "amazing". It is seasoned with good olive oil, garlic and other seasonings that I couldn't quite put my finger on. My husband ordered the toshka, which looked like a Lebanese quesadilla. It was made up of a piece of flat bread which was topped with spiced meat and haloumi cheese, then topped with another piece of bread and cut into triangles. This was served with a side salad topped with a very nice vinaigrette.
The Plat du Jour

Toshka

In summation, this restaurant is not a high-class establishment. There is no wine list - but there are plenty of soft drinks and beers in the cooler from which to choose from. If you are hungry, don't have a lot of time and don't want to spend a lot of money, this is the place for you!
For the two of us, including drinks (cans of soda) it was around 30 Euros. However, as I mentioned before, the rice was out of this world. So much so, that I bought a small container to bring home and eat again for dinner.

I give this restaurant 4.5 out of 5 stars. The reason that I didn't give this place 5 stars is that a lot of the foods are doused with a heavy hand in seasoning. Sometimes the seasoning can be a bit too much.

Snack Libanais

Avenue des Celtes 9
1040 Etterbeek, Belgium
027357599

Monday, June 20, 2011

Easy, Healthy, Tasty Homemade Pizza (Did I mention it tastes good?)

Growing up in Western New York, I was subjected to the beauty of really good pizza. After leaving Buffalo, I came to the realization that pizza just wasn't the same anywhere else in the world. This recipe that I am sharing is not going to come anywhere near the taste of a Buffalo, NY pizza, but it is still really good, cheap and healthy (if you choose it to be). One of the best attributes of this pizza is how quick it can be constructed. I love that the dough does not need to rise (although there is yeast in it) and is also very easy to work with. Here is the recipe for the dough:

3 1/4 cups flour (you can use all-purpose, whole-wheat, or any other type to suit your fancy)
1 package of yeast (the small .25 ounce packets that you can find in any grocery store)
1 tsp salt
1 tbsp sugar (in case you didn't know, yeast eat sugar - so even if you are trying to save on calories, DO NOT omit the sugar)
2 tbsp good olive oil (if you have had your oil for awhile, make sure you smell it before you use it. If it smells like stale peanuts or just smells "off", it has gone rancid. In general, olive oil has a shelf life of anywhere between a couple of months to two years)
1 cup warm water (warm water is essential. Because yeast is a living organism, it needs warm water in order to "activate". Cold water will kill it)

That is all you need to make a decent pizza dough. First, preheat your oven to 375 degrees. Then you can start mixing! If you are lucky and have a stand-up mixer, then your job is very easy. Put on the Dough Hook attachment. Toss in all of the dry ingredients and give them a quick mix with a fork. Pour in all of the wet ingredients and start the mixer on a low speed. Keep going until everything is completely mixed and the dough resembles a smooth ball. Keep in mind that you may need to add more flour or oil in order to get the dough to a workable consistency. Weather wreaks havoc on dough!
If you do not have a stand-up mixer, buy one! but in the meantime, here is what you have to do. Get a large mixing bowl and toss in all of the dry ingredients. Then, take off your rings and bracelets (unless you want dough underneath your rings for all of eternity). Next, stir in all of the wet ingredients. Once the dough has come together, put some flour on your hands and start kneading it on a floured surface until it forms a smooth ball.

Once the dough is finished, spread it onto a well-oiled pizza pan (or cookie sheet if you don't have a pizza pan). Spread pizza sauce onto the dough. Here is a quick tip to save money: don't spend your hard-earned cash on expensive pizza sauce! You can easily make a great sauce at home for a fraction of the cost (unless you are a coupon hoarder and can get pizza sauce for cents on the dollar). All you need is a can of chopped or pureed tomatoes. Empty it into a bowl, whisk in some oregano, salt, basil, or any other spice, and voila! it will be as good as any off the rack pizza sauce! Next, put on whatever toppings you choose. Pop it in the oven for 20 minutes and there ya go (you remembered to preheat the oven, right?). Easy, tasty, and cheap pizza. Believe me, no homemade pizza can taste as good as if you were to order takeout, but this is a very good alternative. Try it out and let me know what you think!

Monday, June 13, 2011

Review of Restaurant De L'amandier (Libramont, Belgium)

A couple of weeks ago, my husband and I decided to take a weekend trip with our dog to the Ardennes portion of Belgium. The Ardennes is famous for dense forests, beautiful scenery and tons of outdoor activities. Considering that we had our dog (who weighs around 100 pounds), we had to find a hotel that would accommodate him. Luckily we found one, The Best Western - L'amandier in Libramont, Belgium.The hotel is nicely situated and has plenty of parking. The rooms are clean and nice. But the real jewel of this hotel is the restaurant located inside of it.
We ate at the restaurant both nights of our stay. The first night we were offered the prix fixe menu (the only option available as there were no a la carte options) and a beautiful bottle of Sancerre. For my starter, I decided on an asparagus dish which featured a small round of asparagus jelée, diced tomatoes and steamed asparagus. Covering this was a small heap of finely sliced red cabbage. It was suberb - very light on the palate and refreshing. For his starter, my husband ordered the pan-seared salmon, which was served on a bed of puréed asparagus, a couple of cockels, a steamed crayfish and a small mound of caviar on top. His starter was large enough that it could have been the main dish. The salmon was cooked perfectly, and all elements of the dish really added up to a wonderful taste.
Asparagus Starter
Salmon Starter

For the main dish, I ordered the pasta with scallops and cockels. I have never tasted pasta as good as this. The pasta was prepared very simply - only with olive oil and a light cream sauce. Intermingled with the pasta were sea beans. I had never tried them before, but I think that I will make them a regular staple of our diet! It was such an amazing dish with tastes that I had never experienced before and the scallops were cooked perfectly. My husband ordered the steak with mushroom sauce (He is a self-proclaimed "meat-a-tarian"). His steak was served with a salad dressed in a balsamic vinaigrette and topped with shaved parmesan. Additionally, he was served french-fries.
Pasta with Scallops and Cockels

Steak with Mushroom Sauce

Dessert was the only sore spot of the dinner. I had ordered an interesting sounding "mojito sorbet". What I ended up with was a wine glass filled with rum and sorbet. It was not very good. My husband, on the other hand, ordered the "Dame Blanche", which is a very popular dessert item in Belgium. It consisted of vanilla ice cream, whipped cream and a little pot of warm chocolate. His was delicious! But I should have known, as every time we go to dinner, more often than not, he orders better than I do.
Mojito Sorbet

Dame Blanche

The second night of our stay, we decided to eat at the same restaurant considering how wonderful the first night was. The restaurant's only option was to order the buffet. While there were some pretty neat items on the table, such as halved quail eggs laid on serrano ham, I would only rate it as mediocre. The food just didn't live up to the previous night's fare.


The one thing I really loved about the first night's dinner was the care that was brought to each plate. It was obvious that the chef had really thought out what he was going to serve. The use of seasonal ingredients was very apparent and the wine list went along very well with the offered items on the menu. I could not have asked for a better meal. Additionally, the prices were incredibly reasonable. For the prix fixe menu, which included an aperitif, starter, entrée, and dessert, the cost was only 24 Euros a person. The buffet was a bit more pricy, at 40 Euros a person, but it included alcohol.

I give this restaurant 5 out 5  stars for their Friday night service and 3 out of 5 stars for their Saturday night service.
Restaurant de L'amandier
Avenue de Bouillon 70
6800 Libramont, Belgium
0261225373
http://www.lamandier.be/index.php?id=30
Price: For 2 people eating the prix fixe menu and a good bottle of wine, expect to pay 80 Euros
Reservations: Necessary